Tuesday, February 9, 2010

Flower Valentines!


Yikes... so much for trying to blog more often on my craft blog! I am wayyyy behind here and I am sorry, but life has been busy with my little fragile Sonya! We have been through quite a bit these past few months including 3 broken bones, 4 surgeries and bisphosphonate treatment. I guess my craftiness has to be put on hold sometimes! I have been working on a few things here and there. I am almost finished a beautiful crocheted baby blanket for my sister's new baby girl Taylor and I just finished blinging out my daughter's pediatric walker seen here.

So, with Valentines just around the corner and my two older girls in school we have about 45 Valentines to either buy or make. Seeing as how this big snow storm is keeping us at home this week, we decided to make some!!! Enjoy!
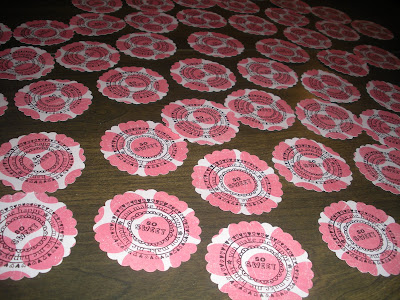
Start out by cutting out a scalloped circle from patterned paper with your paper punch or die cut machine. Next, find a fun stamp and mark your scalloped circle! Our's says : "You make me happy, So sweet".
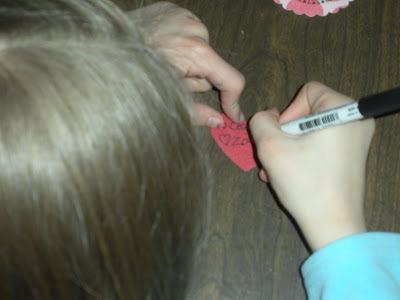
Cut out another scalloped circle of the same size from a solid card stock paper (this will be the back). Cut a heart shape from solid card stock paper with another punch or die. Have your child write the "To and From" part.
Using dimensional adhesive squares attach the heart to the solid card stock scalloped circle.
Using double sided tape or square adhesive photo mounts (really handy) attach both finished scalloped parts to each side of a lollipop!
Tie on some green ribbon to serve as leaves for your flower pop!

Happy Valentines Day!

Monday, November 23, 2009

Bitty Gals Tutorial

Here it is my very first tutorial!
Bitty Gals is what my girls decided to name them. Basically they are peg people! I thought this would be a fun thing to create for stocking stuffers or as one of the little gifts for our advent calendar. I had a load of fun painting them with fun colors and designs and it was super easy!
1. Gather your supplies : Acrylic paints in assorted colors, glossy finish or varnish, paint brushes, fine line paint markers, small artists paint tray or paper plate for pouring and mixing paint, cup of water, paper towels, protective surface such as grocery brown paper bag, and wooden peg people ( mine are actually called "girl game pieces")
2. Paint your dolls head in any flesh color all around and slightly down her front for a v-neck or round neck dress and let dry.

3. Paint your dolls dress making sure to give her a neck by painting a v-neck or round neck top and let dry.

4. Embellish the dress with complimenting colors and designs and let dry.

5. Paint on hair style and let dry.
6. Using fine tip paint markers draw on a face and let dry.
Before you know it you will have a whole entourage of pretty Bitty Gals lined up!

7. Coat using a paint brush all of your Bitty Gals with a high gloss finish or varnish to give them a finished look, let dry and you're done!


I can't wait to see my girls dancing their little Bitty Gals around!
Enjoy and Happy Crafting!

Thursday, November 12, 2009

Party Favor Box Cake

The second I laid eyes on this idea, I just had to have some! Get your free template at Better Homes and Gardens! This was super easy! I just enlarged the template by 200% and used it to create these beautiful treat boxes! I went with the Christmas theme... tis' the season! I plan on using it as an advent calendar, as there are 24 slices. Now I just need ideas for what to fill them with!

Monday, October 26, 2009

Black Apple Doll


My first attempt at the Black Apple Doll! Isn't she cute?! My daughter just loves her too! I made her in under an hour last night with some left over fabric scraps and surprised my little girl in the morning with her! What a great way to use up some bits of scrap material! Want to try one? Go to Martha Stewart's website for an easy free tutorial and free pattern of Emily Martin's Black Apple Doll. Emily also has a fun blog to check out here!
Happy crafting all!

Sunday, October 18, 2009

Scrappin' My Childhood

Ok, it's been a long time since I have posted and I am sorry! I haven't had much crafting time being the busy mama of three crazy girls, but I am going to keep trying to squeeze it in there when I can!

I have been officially scrapbooking for 7 years now! I wish I had 7 years worth of scrapbooking done, but I am no where near that! I love BUYING all the fabulous papers and embellishments my local scrapbook store provides at decent prices, but once home with my latest and greatest stash I have a hard time finding the energy and inspiration to create.

Up until this week my scrappin' has been all about my three gals. I was feeling quite nostalgic though and decided to make it work for me. I headed over to the scrap store with some old pictures of me when I was a kid and came home with the perfect vintagey papers to get my creativity flowing! Here are the results:
Summer '82

Shipbottom, NJ 1981


Sorry about the poor picture quality. I took photo's of the layouts and then cropped them on Photoshop. I wish I had a large 12x12 scanner! It's on the wish list as well as a Wishblade!!! If anyone has any better ideas of how to post 12x12 scrapbook pages on a blog let me know in the comments section!

Friday, September 25, 2009

Craft Talk

This is just too funny! I had to share!

Friday, September 11, 2009

It's Finally Finished!!!

My King size quilt that is! It's finally complete! I started this huge project years ago with my grandmother when my oldest daughter (now almost 8 years old) was at the age where she thought it was perfectly fine to draw on this quilt with markers *gasp* while I wasn't looking! At first this quilt was hand quilted stitch by stitch..... I had made it half way through when I had a not so bright idea and decided to sew it with my machine. Well, it was too thick to fit through the machine but I tried anyways and the quilt ended up all bunched up in a mish mosh of stitches! It was a wreck! Marker all over the backing and crumpled, wrinkled and stitched up top!

We pulled it all apart again together, my grandmother and I and we, ummmm.... I mean SHE fixed it ALL for me! She bought a gigantic quilting table and machine, had it set up in her sun room (I helped a little setting it up), bought new backing for the quilt and then she sewed, sewed and sewed some more until it was all quilted and brought back to life again! Her craftsmanship is AMAZING! I just finished putting on the binding around the border and I plan on stitching on a "quilted by" label with our names. It is finally finished, all the love sweat and struggle you could ever want poured into my very first quilt, and only quilt so far... That was crazy hard stuff! I don't know if I have the strength or time to attempt that ever again! Thank you Mommom!


That would be my 20 month old daughter enjoying the comforts of handmade!


I thought it would be great to have a few pictures of it on my bed, but hubby is sleeping in it right now! He's a third shift worker. So I decided to hang it off the edge of my daughter's crib and guess what? I think it blends pretty well with her unique decor! Hmmm... a certain somebody is going to be getting her big girl Montessori bed soon! I would definitely have to fold it in at least half, maybe into quarters for it to be Sonya sized!