
I have totally been enjoying my new art journals. That's right, "journals"! I liked the new one I just picked up so much that I went right back to the store and picked up a second one! Working in more than one journal at the same time is fantastic! While I'm waiting for something to dry or set in one journal, I can go crazy on a separate journal never losing my flowing ideas.
The journals I am using are Cachet by Daler Rowney. The weight of the paper is 75lb and the size is approximately 7x10. The only issue I've been having lately, other than writer's block, is that sometimes the dry paint sticks to the opposite page when I close the journal and causes some tearing. I don't mind it so much right now, but when it tears off a few words after I finally get out of this writer's block hell, I think I'm going to freak out.
Here's some new work and progress pages...
I added some black copic outlining and the center tears occurred on this one... still a work in progress and untitled.
 "Emerge" - Journaling added... "Wanting to shine she muffled a pathetic residue of herself, emerging alive and new at midnight, beams aglow in secret joy." I have to confess... I found a new app on my iPhone that is helping me with my writer's block. Similar to magnetic poetry, Poetry Creator is fun and gives my brain a jump start.
 I have found a huge source of inspiration and tutorials on fun techniques to try on Pinterest! I'm hopelessly addicted. Check the upper right area on my blog for the button to follow me on Pinterest!
This untitled work in progress was done using rubber cement and acrylic.
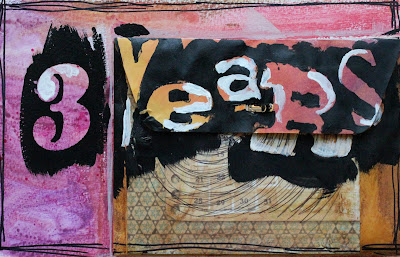
 "Pop"... as in I really want my pages to pop and stand out! Rubber cement, alcohol ink, acrylic and copic marker.
 Untitled work in progress - Caran D'Ache Neocolor II (probably one of my favorite products) and alcohol ink
 Untitled wax relief - crayon and watered down acrylic.
 "Blossom" - "Rich dreams play in my intensified darkness. Friendly habitual amnesia echoes clearly. The heart blossoms." Thank you again Poetry Creator... Acrylic, spray ink and copic markers.
 Untitled work in progress - Watercolor saran wrap technique, alcohol ink and copic marker.
 Untitled work in progress - Watercolor and copic marker... some tearing occurred here.
 Untitled work in progress - Oil pastel, black gesso, white Galaxy marker.
 Untitled work in progress - Shaving cream and acrylic... I kid you not, that's how this happened! I'm telling you, follow me on Pinterest!
 Untitled work in progress - Acrylic
 Untitled work in progress - Neocolor relief - Caran D' Ache Neocolor II and black gesso.
 Untitled work in progress - Black gesso, acrylic, gel medium, copic marker, watercolor and alcohol ink.
 That's all for now... I hope to post more often in smaller segments but sometimes my creative mind gets the best of me and I end up creating more and blogging less.

 Untitled... work in progress, although I like it as is too.
 Untitled.

 "Inspired"

 "Expand Your Horizons"

 Untitled... work in progress. Sometimes it's fun to see the beginning of a piece and compare it later to it's finished state. This reminds me... I want to make one of those time lapse videos while I work. Should be interesting. note to self : must Google the how to process on time lapse...
 Untitled... still feel like it's missing something (other than the journaling that I have to script in there). I can create just fine, but I have writer's block at the moment.

 Well, that's all for now... Until next time!
 Once you have it lined up right, hold it in place with one hand while tracing the edges with your pencil. The insert might be a little bumpy along the folded part. No worries though, we'll be trimming this!

 Place your cut out image into the back plate of your case. Does it fit? Trim if necessary to get the right fit. I had to trim those bumps from the folded insert and a little along the bottom to get it just right.


 Take your case off the image and place your cutting board underneath. Take your exacto knife and carefully cut out the hole.

 Click the top part of the case on and there you have it!
 Enjoy the new look!


